For Developers and Technicians
OVMS includes a range of CAN tools including multiple logging formats, a configurable OBD2 translator, a DBC decoder, a reverse engineering toolkit and a CANopen client. The module provides SSH access and WebSocket streaming and can stream and inject CAN frames via TCP. Both the module and the web frontend can be customized by plugins. The module has three builtin CAN buses and can be extended by a fourth one.
Opportunities for development include both extensions to the core framework (such as for new notification mechanisms, new protocols, etc), as well as adding support for new types of vehicles or extending the supported functions in existing ones. While core functionality is usually developed in C++ using the Espressif IDF, OVMS also includes a JavaScript engine for powerful scripting.
Open Source and GitHub
The source code for OVMS is stored on GitHub in a public core project repository called 'Open-Vehicle-Monitoring-System-3'. The GitHub way is for developers to create their own GitHub account and to fork their own copy of that core repository. You can then work on your own copy, periodically pulling (merging in) updates from the core repository to your own copy. When you are ready to contribute back, you create a pull request, and the core project maintainers will merge back your improvements.
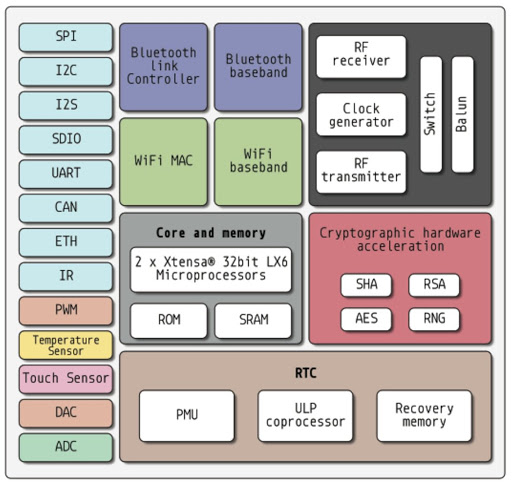
The OVMS Developer Guide is a comprehensive document that describes the different development tools available to OVMS developers. Version 3 of the Open Vehicle Monitor System module is based on an Espressif ESP-32 microcontroller module (Wifi and Bluetooth support, dual core ARM processor, RAM and FLASH). The Software Development Kit used is Espressif’s ESP IDF, which is based on the open source GCC compiler plus a large number of support libraries and FreeRTOS based operating system. ESP IDF runs under Windows, Linux and Mac OSX. OVMS also includes a JavaScript engine for on-device scripting.
The OVMS source code is split into several GitHub repositories:
Before we start with some general suggestions for adding support for a new vehicle, I would like to say thank you. Your time is valuable and your contributions are appreciated. OVMS is an open source community project, and we rely on our developers to take this project forward. New vehicle support comes from the owners of those vehicles developing that support, along with the help of other experienced developers working on other vehicles or framework components. We work together to extend the project.
1. The first step is to sign up for the developer's mailing list, and let people here know that you are working on a particular car. Perhaps other owners are also interested and can help.
2. Next is physical hardware reconnaissance. You need to find out what sort of communications buses your car has, what vehicle modules (ECUs) are connected, what speed the buses run at, where the diagnostic connectors are, and what each pin does. The OBDII connector is pretty standard in modern cars, but is often not the only connector. It is often common to see many different types of communication buses such as CAN, LIN, K-Line, and others. Of particular interest is any communication buses connecting the car to its user visible displays or telematics modules. Google is your friend here. You can also look for service manuals, or talk to your friendly mechanic. The absolute last resort is to get out a multimeter, trace cables and measure signals. For OVMS, you are in particular looking for CAN bus networks.
3. The next step is to look for documented signals on those communications buses. Network traffic is commonly either polled (the diagnostic tool sends a request for a particular piece of information, and the vehicle module replies with the current value), or active (the information is broadcast repeatedly, usually at a set interval). Most cars use a combination of both. Sometimes these are published as online resources on enthusiast websites, and other times the manufacturer or diagnostic tool supplier has the information. There are standardised formats for this (such as DBC for active networks, and PIDs for polled).
4. You then need to look for existing diagnostic screens and information. As well as the general user interface of the car (temperature displays, speedometer, etc), there may also be maintenance screens and lower level diagnostics. These are incredibly useful for the work you will be doing.
5. OK, now it is time to step away from the Internet and go to the actual car. You are going to want to record the traffic on the car communication buses, while doing different activities (such as charging the car, parked idle, driving, reversing, turning, etc). We call these "CAN bus dumps". Write down notes next to each dump, describing what you were doing, where, when, and what the key metrics shown in the car were (state of charge, odometer, speed, type of charge, charge rate, etc). The tools I use for this are OVMS (with an appropriate cable to connect it to the car networks) and SavvyCAN (a cross platform application you can run on a laptop) - you can connect the two over WiFi. It is a good idea to have the car reachable by wifi, which allows you to do a lot of work from inside your house (rather than in the driver's seat with the laptop propped up on the steering wheel).
6. Now is the time to look for specific metrics. You can find the full list in the OVMS documentation, but we suggest you start with basic things like car on/off state, gear selection, speed, State of Charge (SOC), range displays, etc. I always go for SOC as my first target, as it gives instant gratification. At this stage, you will be looking for a particular metric, and you are going to be comparing what signals are on the car's communication buses against what is displayed on the car's diagnostic display. This may not be a 1-to-1 relationship. For example, the odometer may display to the nearest kilometre, but the metric on the car communication bus may be in 1/10ths of a mile. Other metrics are in floating point, or different byte orders. Often the change in a metric is the biggest clue - a SOC would increase during a charge and decrease during a drive, for example. SavvyCAN can help with this. When a door opens, you would expect the appropriate signal on the CAN bus to change appropriately.
7. Once you've found a few metrics, it is time to add support. You will need some programming knowledge here, and be very familiar with computers. We use the C++ language, which is like C on steroids - vehicle modules are not complex and there are plenty of example vehicles to learn from. Setup your build environment (the developer's guide has the detail for this), clone the OVMS firmware to your own GitHub account, and try to build the standard firmware and flash it to your module. Then, add a stub for your vehicle. Just a piece of code that allows you to select the vehicle but does nothing (you will create components/vehicle_ and modify main/Kconfig to add it as an optional vehicle). Modify your vehicle module to initialise the appropriate CAN bus support, and decode the metrics you know. Flash it to your module, then fire up the App and get the instant gratification of being able to see your battery level (for example). You won't have every metric supported at this time - just get a few working and you'll be encouraged to find more.
8. Now it is time to contribute. Add, commit, and publish your changes to your own GitHub repository, then use the GitHub tools to send in a pull request (for us to merge your code back). Please don't forget to add some documentation, so others can share in what you have achieved.
9. From that point on, it is an iterative journey. Discovering and adding more metrics, and then starting to look for things like door lock/unlock functionality, etc. I find this a fascinating journey - the process of discovery is to me even more rewarding than the final vehicle support.
Again, thank you for your contributions, and happy hacking!
Mark.
Connect with us
Connect to other OVMS developers using our mailing list
You can also find us on social media